
Most tile projects require the use of a mortar-based glue known as thinset. This adhesive is typically made with cement, fine sand, and a water-retaining additive.
Before Tile Installation Jacksonville FL laid the tile, they laid down a chalk line and made measurements of the wall to establish a layout plan. This is important to ensure that the tiles will fit properly and avoid installation issues like lippage, where one tile is higher or lower than its neighbors.
A good tile installation doesn’t start with the mortar or wet saw, but with a careful layout. Whether your tile is square or rectangular, small or large, a proper layout can elevate the look of any room and increase the resale value of your home.
Begin by marking the vertical and horizontal center points of your wall using a tape measure and level. Identify the wall’s most visible point, such as the doorway, as this will be the first place you’ll set full tiles (cut tiles at the doorway can be distracting). Snap a chalk line across the doorway (1) and another perpendicular to it (2), centered in the door jamb. From this point, extend your layout lines horizontally and vertically to the nearest corner of the room (3). This will give you a reference point for the layout of your cut tiles and help keep them straight and even as they are installed.
Most square or rectangular tile works well in a simple grid layout. However, you can make a room pop with a herringbone pattern that creates a lively verticle and horizontal zigzag movement in your space. This pattern is easy to accomplish with a little practice, but it can be difficult to perfect without a clear plan of action.
When working with a herringbone pattern, it’s important to mark your layout lines correctly. The typical method involves creating a pyramid over the layout line, which can be tricky if your tile has a diagonal direction (the corners of the pyramid need to be aligned with the line). To make things easier for yourself, consider laying out a block of tiles on the floor before you begin setting them to see how your pattern looks.
Another common tile layout is a checkerboard pattern. This simple, timeless pattern catches the eye and can add balance to petite rooms or highlight an art piece. Use a wide range of colors in this design and experiment with different size tile to find the best mix.
The installation process may differ depending on the type of tile you choose, but there are some basic steps that are taken on most projects. This includes clearing the room, removing any furniture or appliances, and preparing the substrate and subfloor. Depending on your specific flooring, you may also need to use different types of underlayment and mortar.
A basic tool kit for any tiling project should include an ergonomically designed spatula (a flexible or rigid option based on the material you are working with), notched trowel, and tile nippers to help you cut and shape your tile as needed. It is also important to have the correct safety gear, including gloves, eye protection, and a face mask.
Before starting the actual tiling, it is a good idea to lay down a sheet of newspaper or a drop cloth in the area to prevent any potential spills or mishaps. This can help protect the floor from any accidental spills and also makes cleaning up any potential mess much easier.
During the preparation stage, the adhesive mix should be perfected. You want to ensure the consistency is right and that it will bond well with the surface you are tiling. It is also a good idea to ‘back-butter’ the tiles, which means spreading a thin layer of adhesive on the back of each tile for better adhesion and a cleaner finished product.
Once you are ready to begin, start in the center of your layout lines and work outward in quadrants. This will make sure that you end up with a symmetrical and aesthetically pleasing arrangement that won’t have any tiny pieces of cut tile on the edges.
It is also a good idea to make a list of all the tiles you need to install and the sizes that you will need for each one. This will help you avoid wasting time and resources by installing tiles that are too small or large. In addition, it is important to measure and score your tile before cutting it with a wet saw. This will prevent the tile from snapping off of the scored line when you cut it.
Tile is an excellent choice for floors, counter tops and showers. It can also add style to walls and even a fireplace surround, but it should be properly installed so that it lasts. If it isn’t, the result can be a cracked, mildewed mess. To avoid these problems, a professional tile installer can guide you through the process and provide the necessary equipment and tools to get the job done right.
The first step is to clear the area. This involves removing furniture, moving appliances and if necessary, removing baseboards or molding to ready the substrate for tiling. After the subfloor is prepared, it should be allowed to slake, or rest, for about 10 minutes before applying the mortar and laying tiles.
There are several different ways to lay tile, but the easiest is known as a straight lay. It’s important to plan the layout of the tiles before starting so that the edges look clean and well-balanced. It’s also a good idea to dry-fit the cut tile before installing it to check for sizing and to make sure it fits correctly.
When laying tile, it’s generally recommended to start in the center of the room and work outward from there. This method makes it easier to spot any areas that need adjustments or cuts. It’s also possible to use a herringbone pattern, but this is a more complicated approach and should be discussed with a pro if you are considering it.
Using the tile cutter, cut tiles to fit along the walls and corners of your room. If the edges are not clean and neat, it is a good idea to use a caulk or epoxy to fill in any gaps before the tile is set.
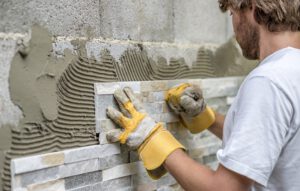
The next step is to apply a thin layer of the adhesive to the wall. It is usually a good idea to spread the adhesive evenly and use a notched trowel to do so. Depending on the type of tile, it may be helpful to “back butter” the back of each piece to improve adhesion.
When a tile installation is completed properly, it will last for many years with minimal risk of mildew and other problems. Professionals use a variety of specialized tools to do the work, some of which can be purchased or rented at home improvement or tile stores.
These tools include measuring tools, such as a straightedge, carpenter’s square, and tile spacers, along with a leveling system to ensure the wall is flat. Mortar is typically applied with a notched trowel, which has notches the size of a tile’s thickness, to create grooves for better adhesion. Once the mortar is applied, tile installers begin to lay tiles. They generally start from the center of the room and work outward, completing one row at a time. This is to avoid having a wall full of tiny pieces of cut tile on the edges, which would look unbalanced and unsightly.
Once the first batch of whole tiles are laid, installers need to trim and place the edge pieces. They may need to use a wet saw for the best results, especially when working with thicker tile, or where the cuts will be visible. A snap cutter can be used for thin tiles or those that will be covered with molding, and a pair of tile nippers can be used for corners and other curved cuts.
During this process, the installers will need to clean up any excess mortar that squeezes out with a damp sponge or cloth. This is important because it can be extremely difficult to remove once it dries. They will also need to wipe away any excess adhesive that has oozed out from the back of a piece of tile as well.
When all of the entire tiles are in place, they will be rapped with a short block of wood and rubber mallet to “set” them in the adhesive and flatten the surface. This will help prevent any loose, cracked or chipped tiles later on, and it helps the grout adhere to the backs of the tiles as well. The installers will need to keep a close eye on the area where they’re working, so they can remove any tiles that are loose or uneven as soon as they notice it.